How to get started with HiBoop
Welcome to HiBoop! This quick-start guide walks you through the essential steps to get up and running — whether you’re a clinician, admin, or part of a clinic onboarding for the first time.
Each step links out to more detailed instructions if you want to dive deeper.
Step 1: Log In and Set Up Your Account
You’ll receive a welcome email from HiBoop. Follow the link to set your password and log in.
If you’re a clinic admin, you’ll also be prompted to set your clinic name, timezone, and preferences.
Clinic Management → How To Login)Step 2: Add Your Team
Clinic admins can invite additional users (clinicians, viewers, etc.) and assign roles.
Page → How Do I Add Staff To My AccountStep 3: Add Your First Patient
Click “Add Patient” from the dashboard and enter basic details like name, date of birth, and contact info. You can also include demographics and relevant conditions.
Patient Management → How Do I Add A PatientStep 4: Send an Assessment
You can send an assessment right away or assign a full schedule (like an intake or follow-up program). Assessments can be delivered via secure link, QR code, or in-clinic tablet.
Patient Management → How Do I Issue An AssessmentPatient Management → How Do I Add Program TemplatesStep 5: Review Results and Track Progress
Once your patient completes an assessment, you can view results in their chart — including score breakdowns, visual trends, and symptom severity over time.
Patient Management → How Do I View Patient ResultsNeed Help?
- Questions? Reach out to your Customer Success Manager or contact [email protected]
- Want to request a new tool? → Learn how to request an assessment or feature
- Curious about terminology? Check out our Glossary of HiBoop terms
How does the assessment flow work?
This article explains how HiBoop’s assessment form logic works — including pre-screening, condition-based triage, long-form assessment delivery, and how schedule settings shape the patient’s experience.
Overview of the Assessment Flow
HiBoop’s form is not a static list of assessments — it’s a smart, dynamic flow built at the moment of delivery, using:
- Demographic questions
- Pre-screen responses
- Known related conditions
The result: patients receive only the most relevant assessments for their needs, in a clean, unified experience.
Step 1: Demographic Questions
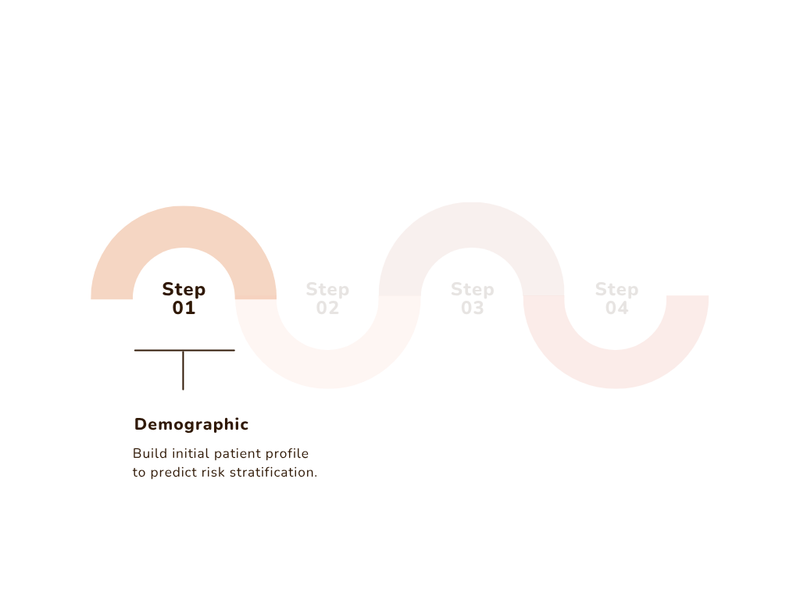
If the patient is new, the form begins with a demographic section, where they can provide:
- Age, gender, and sex
- Cultural background or identity factors
- Relevant social or systemic risk factors
These questions are customizable and appear only once at the start of care. They can be reviewed or edited by clinicians and patients later if needed.
Step 2: Pre-Screening
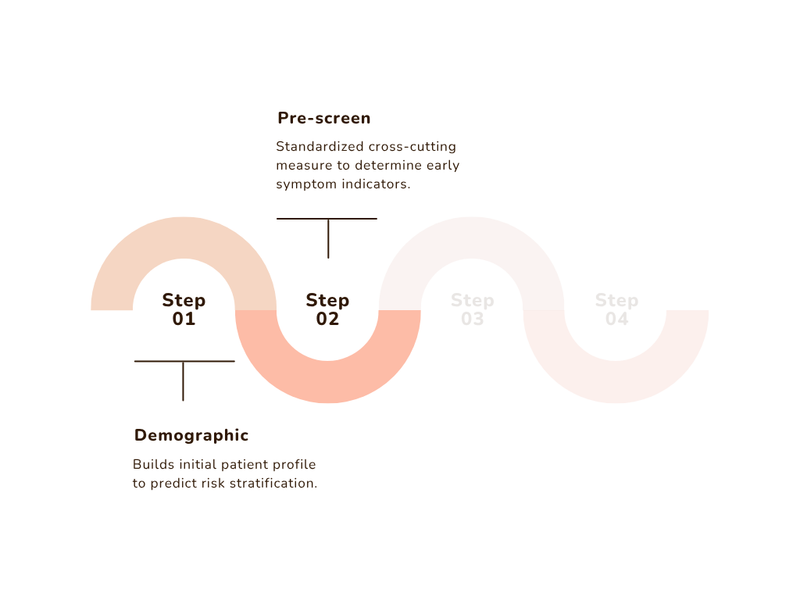
HiBoop uses a brief clinical pre-screen to identify relevant symptom domains. When a patient indicates a level of severity on any domain the corresponding full-length assessment is triggered automatically.
The tool used is based on your clinic’s configured preferences (e.g., GAD-7 for Anxiety)
Step 3: Conditional Triage to Full Assessments
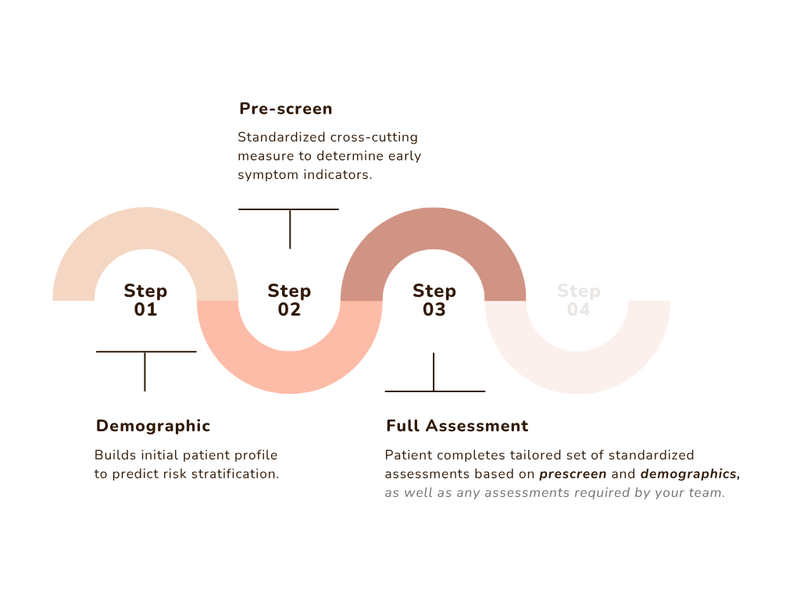
Based on the patient’s responses to the pre-screen:
- Relevant full-length tools (e.g., GAD-7, PHQ-9, PCL-5) are added automatically
- Irrelevant tools are skipped to reduce burden
- If an assessment is marked as required in your schedule, it is shown no matter what
This helps reduce form fatigue while ensuring high clinical coverage.
Related Conditions Logic (Optional)
If your clinic enables Include Related Conditions, HiBoop will do two things:
- Automatically trigger long-form assessments when a patient reports above-threshold severity in the prescreen.
- Check for and trigger additional assessments based on comorbid risk patterns and commonly misdiagnosed conditions.
For example, if a patient screens high for depression, HiBoop may automatically trigger the PHQ-9. At the same time, it might also trigger tools for anxiety (a common comorbidity) and ADHD (a condition often misdiagnosed as depression, especially in adults).
💡 You can define your preferred tools for each condition — these will be used for both direct matches and related condition logic.